


Let's continue our tour of the lower extremities with a look at the two largest bones of the lower extremity, skipping over the knee for now. I spoke of the principles of intraosseous work at length in two previous articles: "Intraosseous Restrictions,"1 and a more recent article in this series, "The Hip Joint - Another Perspective: Intraosseous Restrictions of the Neck of the Femur."2
One of the functions of the long bones is to absorb shock.
I'll start with the tibia. Why the tibia? What is the significance of this bone? Paul Chauffour, DO, talks about the importance and frequency of findings of tibial intraosseous restrictions.3,4 George Roth also emphasizes these intraosseous lesions.5 In my experience, tibial intraosseous restrictions are both common and clinically significant. Most of us, or at least the sports medicine docs, recognize how significant the normal dorsiflexion of the ankle is to the gait cycle. When the tibia has no give in the anterior-to-posterior direction, this seems to affect ankle dorsiflexion.
The tibia is very accessible, as it has minimal muscular covering in the front. This makes it easy to palpate, and also makes it easy to traumatize. How many times have you bruised your shin by walking into something you didn't see? The tibia is an excellent location for you to begin to develop this new skill of evaluating and correcting long bones. The tibia is easy to recheck and it is easy to see associated clinical changes. Wait on assessing the femur until you have a sense of the quality of restriction that affects long bones, from your experience with the tibia. My descriptions that follow can be applied to both the tibia and the femur.
How can you scan for these problems? For evaluation of this large area, I will start with listening, outlined in my article, "Prioritization Tools: Finding the Primary Subluxation."6 Glide the palm of your hand slowly over the anterior surface of the long bone. Where does the tissue feel like it's pulling you in? Your intention, the question you are asking with your mind/body interface, is to feel for intraosseous restrictions or other lesions within the bones. Your physical contact is strictly superficial; your intent is to assess the full depth of the tissues under your hand. When you feel a "magnetic" pull, when you feel yourself pulled toward the bone, stop at that spot. You can confirm your finding by sinking toward the bone at that level, palpating for tenderness and restriction.
You can also screen directly through palpation: Work your way inferior down the tibia, pressing along the whole surface, looking for areas of tenderness and restriction. The surface of the body seems to act as a display screen for lesions deep to the skin, and the surface will be stiffer and tighter over a lesion.
How can you tell if you are finding bony restriction, versus muscular or fascial tightness? Testing for intraosseous restriction is not really about motion, but rather about "give" or stiffness. A bone is not a joint; the quantity of motion here is quite small. Most of you know how to palpate muscles, so I'll focus on palpating bones. To palpate and distinguish bony restriction, you must sink through the soft tissues to the level of the bone. The challenge is to do this gently. Layer palpation of a new deep tissue is always a challenge. You are utilizing your ability to feel through the fluid layers of the fascia and muscle. It's not about physically forcing your hand all the way down into the bone itself.
Palpating for intraosseous restrictions is easier on the tibia, where the bone is right at the surface. On the femur, you are pressing through a large muscle, the quads, and have to gradually sink to get the feeling of bony restriction. When you start, it is useful to compare to the opposite extremity, and to areas just above and below, feeling for the difference in tenderness through patient feedback, and feeling for the difference in the quality of restriction. Be easy on yourself. This is a substantially different experience than palpating the spinal joints you are familiar with. You can confirm your findings with muscle response testing or leg checks.
Okay, so you've found a distinct location on the tibia and/or femur. It is both tender to the touch and feels stiff. An additional confirmation for the tibia is that on the posterior side at the exact level of the intraosseous restriction, you will usually find a sharply tender knot in the calf musculature.
Now, get specific. There are two basic types of intraosseous restrictions that affect these long bones. One is a long axis problem of linear compression or linear expansion. You can test this with palpation by grasping the whole bone, above and below the area of the lesion, and first compressing and then pulling apart. Does one of these motions feel stiffer? If you have no idea, don't despair; your database is probably close to zero at this point. Do this once, and you may be confused; do it 10 times and you'll begin to get it. Do it 100 times, and it's fairly easy. Do it 1,000 times, pay attention, and you will be a master.
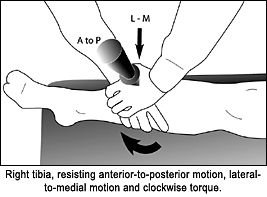
The second major type of intraosseous restriction is a lack of bowing, a lack of bending of the bone. Begin by engaging, sinking into the feel of the bone. You are just trying to get a sense of the normal "give" within a bone, compared with the stiffness of the subluxation. Please, don't press too hard. You could possibly fracture an osteoporotic bone. Begin your assessment with anterior-to-posterior pressure. The second direction of interest is lateral to medial versus medial to lateral. Finally, add a check for torquing by adding a rotational pressure, both clockwise and counterclockwise, with your hand. The picture below shows assessment of a tibia that resists anterior-to-posterior motion, lateral-to-medial motion, and clockwise torque. It is possible that the restriction is posterior to anterior, which you'll test through the larger posterior muscles, but you'll tend to find this less often, especially in the tibia. You are trying to establish, in three dimensions, the exact restriction of the bone. This is another skill that can be time-consuming or confusing at first. Eventually, you will just engage the bone and have a holographic sense of the direction of the restriction.
Now you know where the lesion is, and you have a sense of the direction of restriction. How do you correct the restriction? You can use either recoil or Engage, Listen, Follow (ELF). See my article on these techniques, "Adjusting Techniques, Part Two: Using ELF and Recoil."7 Using ELF, a variation on direct myofascial release, you'll feel the bone release in 10-60 seconds. In ELF, you engage the restriction, and then feel the area begin to spontaneously release under your gentle pressure. I often enhance my ELF on these areas through the use of my percussor. I'll use this powerful instrument with one hand, either directly through the area or from the side, while my other hand is engaging the tissues via ELF. On heavy bony structures such as the femur or pelvis, or structures covered by dense muscle, the percussor enhances the release enormously, and saves my hands and wrists. The percussor by itself is not adequate; you'll need to use it to "liquify" the tissue, while your active hand is giving direction to the tissue, doing the specific three-dimensional release. For recoil (engage-release), you'll line up the exact three dimensions of restriction under your contact, and suddenly release your contact. You cannot use classic chiropractic thrust techniques on an intraosseous restriction, as there is no joint to release. Muscle energy is not really a good choice, either, as this is not really a muscular lesion. When you've corrected this bonystiffness, both you and the patient will appreciate the often dramatic response in both the bone and in the surrounding tissues.
When do I look for these intraosseous lower-extremity lesions? Clinically, any lower-extremity or pelvic problem could have a contribution from stiffness in these bones. Ideally, you'll develop a rapid scan of the femur and tibia as part of your evaluation protocol. I firmly believe that "anything can cause anything." The broader your ability to assess and treat, the more likely you are to have success with difficult patients.
Reference
- Heller M. Intraosseous restrictions. Dynamic Chiropractic, Nov. 5, 2001: www.chiroweb.com/archives/19/23/12.html.
- Heller M. The hip joint - another perspective: intraosseous restrictions of the neck of the femur. Dynamic Chiropractic, Oct. 21, 2004: www.chiroweb.com/archives/22/19/15.html.
- Chauffour P. Mechanical Link. North Atlantic Press, 2002.
- Chauffour P. Mechanical link courses through the Upledger Institute, 1996-2002.
- Roth G. Tensegrity matrix workbook and courses, 1999-2003.
- Heller M. Prioritization tools: finding the primary subluxation. Dynamic Chiropractic, Sept. 12, 2001: www.chiroweb.com/archives/19/19/06.html.
- Heller M. Adjusting techniques, part two. Dynamic Chiropractic, Sept. 1, 2001: www.chiroweb.com/archives/19/18/07.html.
Click here for more information about Marc Heller, DC.