


The major questions to ask are: Where is the patient unstable? At what site? And in what direction? Sahrmann talks about the most common direction of failure in the lower back being into flexion with simultaneous rotation. The flexion piece is relatively easy to assess. Watch the patient go from sit to stand; watch them attempt to do a waiter's bow (bowing forward while keeping their back straight); and watch them squat. If they can maintain a neutral spine in these movements, they probably have decent flexion control. If they cannot, if the lumbar spine goes into flexion, then they need to work on controlling flexion. Now let's focus on pelvic rotational instability.
Testing for SI Rotational Instability
Barbara Hungerford developed a simple test that assesses SI instability called the functional load transfer test.1 This test, which has been researched and validated, is similar to the original Gillet stork test, but substantially different as well - both in the goal and the execution. Gillet had the patient lift the bent leg fairly high while assessing motion deficits in the sacroiliac, specifically looking for what joints don't move. The functional load transfer test, however, assesses on the weight-bearing side while looking for excessive motion rather than restriction.
Let's look at the right side, which seems to be the dominant side where this instability shows up. We'll use right-side weight-bearing, left-side lifting throughout the examples. Stand behind the patient and ask them to slowly lift the left leg up just a little, flexing at the left hip and left knee. You have your right thumb on the PSIS and your left thumb on the sacrum at the same horizontal level as your right thumb. The key is in the first moment - when they begin to lift the left leg to transfer weight to the right leg.
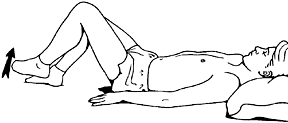 Supine Marching for SI Stability.
In someone with a normal lower back, your thumbs will remain even. In an unstable pelvis where the right side is unstable, the right PSIS will rotate forward, appearing to move away from you. This is an indication of rotational instability of the pelvis. The ASIS is moving forward into an anterior rotation of instability (into the position of open pack) for the SI. The patient has to correct this to stabilize their pelvis.
Supine Marching for SI Stability.
In someone with a normal lower back, your thumbs will remain even. In an unstable pelvis where the right side is unstable, the right PSIS will rotate forward, appearing to move away from you. This is an indication of rotational instability of the pelvis. The ASIS is moving forward into an anterior rotation of instability (into the position of open pack) for the SI. The patient has to correct this to stabilize their pelvis.
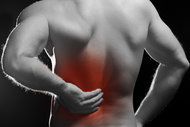
This doesn't mean that everyone with this instability will have pain. It just means that they are more prone to problems. A minor injury or sitting too long is likely to set them off and can be difficult to normalize. In someone with chronic pelvic or lower back pain, this has to be stabilized in order to heal.
This test encapsulates the whole point of this series on rehab. You, the doctor, need to be able to find not only where the patient is not moving, but also where they are moving too much. This simple test gives you a big part of the answer for the sacroiliac.
Teaching the Patient to Correct SI Rotational Instability
You may be familiar with the supine marching exercise for sacroiliac stability; it is a simple variation on the supine dead bug exercises. (Read "Supine Marching for SI Stability" at www.marchellerdc.com.2) The goal is getting the patient to be able to lift one bent leg while the pelvis remains stable. Note that this is an equivalent position to the standing functional load transfer. The weight is taken by one limb and one hemipelvis while the other side is lifted.
Caption: Supine Marching for SI Stability
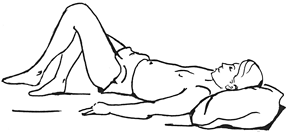 Bridge Position With Marching.
The patient lies supine on a firm surface, in a hook lying position, and monitors both ASIS with their fingers. The patient must keep their legs hip-width apart. (Note: They are cheating if they adduct or bring their legs closer together.) They then begin by lifting the bent left leg 2 inches off the floor. The patient places their fingers over both ASIS bilaterally. Observe whether the left ASIS drops toward the table. It's a sudden motion occurring at the moment they begin to raise the leg; sometimes obvious, sometimes less obvious. (In some patients, you will see the motion while the patient won't be aware of it. If they can't see or feel it, ask them to pay attention as they place the bent left leg back on the floor. At that point, the left ASIS will rise up suddenly.) The patient passes the test if their pelvis can stay still while they lift the leg. Initially, instruct them to do this test without consciously activating their core. If they fail this test, then teach them to activate their core while they lift.
Bridge Position With Marching.
The patient lies supine on a firm surface, in a hook lying position, and monitors both ASIS with their fingers. The patient must keep their legs hip-width apart. (Note: They are cheating if they adduct or bring their legs closer together.) They then begin by lifting the bent left leg 2 inches off the floor. The patient places their fingers over both ASIS bilaterally. Observe whether the left ASIS drops toward the table. It's a sudden motion occurring at the moment they begin to raise the leg; sometimes obvious, sometimes less obvious. (In some patients, you will see the motion while the patient won't be aware of it. If they can't see or feel it, ask them to pay attention as they place the bent left leg back on the floor. At that point, the left ASIS will rise up suddenly.) The patient passes the test if their pelvis can stay still while they lift the leg. Initially, instruct them to do this test without consciously activating their core. If they fail this test, then teach them to activate their core while they lift.
Five Strategies to Stabilize
There are five different strategies you can use to get patients to properly stabilize for this challenge. The first two are basic core activation. The three others are asymmetric, using specific unilateral muscles to prevent rotation. It seems that about 80 percent of patients have more trouble when weight-transferring to the right, failing into left rotation, implying that the right multifidus and the left internal obliques are not working. We will use that as our standard scenario. They only need to do the exercise on one side if they are failing on only one side.
The doctor is doing two things during the test and the exercise. While sitting next to the supine patient, watch the patient's ASIS for unleveling as they lift the bent leg; and place your left fingers under the patient, with the little finger just medial to the right PSIS, and see if they are activating the right multifidus group. I also move my hand superior to the thoracolumbar junction to feel if the patient is overfiring their erector group.
Here are the most useful cues, beginning with the two basic activation strategies. The final three cues are aimed at specifically correcting the rotational component and firing the right multifidus and the left internal obliques.
- Have the patient gently Kegel (up to 30 percent of maximum). The Kegel action activates the pelvic floor, and the patient gets a co-contraction of the rest of the deep stabilizers, including the multifidus.
- Have the patient gently extend by moving toward 6 o'clock, gently pushing the tip of the tailbone into the floor. This fires the multifidus as an extensor. Make sure they don't overfire the erectors here.
- Have the patient gently load into the right foot (this utilizes ground reaction force.3)
- Have the patient imagine bringing the right PSIS toward the midline (think of "wrapping" around the back).
- Have them activate the obliques by imagining the left ASIS wrapping around the front, toward the belly button.
All five of these are done gently as isometrics. Some patients will torque their whole pelvis on the last three cues. Don't let them. This is a low-load exercise. Most patients don't need to use all five strategies to stabilize. Just try them one by one and determine the minimum it takes to stabilize them. Then check off which strategies they should use.
Sometimes the patient will fail the standing test, the functional load transfer test, but will look relatively stable supine. In this case, you can add a stronger challenge supine. Ask them to bridge up from the hook-lying position, and then to lift the bent left leg. The left ASIS will usually drop more dramatically in this test. If the patient has the strength, you can use the same strategies outlined above to stabilize. If this is too hard for them, peel back and have them just bridge up an inch or two for starters.
Caption: Bridge Position With Marching
There is an end point here. The goal is to get the patient to be able to do both versions of these supine challenges successfully, the standard version and the bridged up version, without consciously firing their core muscles. In other words, can they lift the bent leg and remain stable, both while their back is on the table and while in a bridge, without pre-firing their core? Once they can do so successfully, they are done with these exercises.
Further Thoughts and Theory
In my attempt to keep it somewhat simple, I've given you the test and how to correct with exercise. For those with further interest in the subject, you can use a similar test, with slight modification, to assess for lumbar instability.4 This is another gem, although this piece has not been researched or validated. If you do the same test, have the standing patient slowly lift the bent left leg; this time, move your thumbs up into the lumbar spine, and assess for instability at L5 and L4. The right thumb is on the transverse process of L5, the left thumb is on the same horizontal, just lateral to the spinous process at L5. Do the same for L4 and above. I suspect that we are assessing the multifidus at the tested level, rather than truly assessing joint motion. Your fingers are on one spinal level, not bridging two levels.
Here is another question. What muscles are we focusing on to stabilize this motion? The original developers of this test, Hungerford and her colleagues in Australia, would probably say that the key muscles are the deep local stabilizers of the spine, the deep fibers of the multifidus and perhaps the transverse abdominals. I suspect that a McGill-trained rehab doctor would not focus on these small motions, but would be more broad in their focus, not emphasizing the local core.
My view of this is strongly influenced by my recent training and study, which emphasizes that once you put a rotational challenge into the spine, the local stabilizers designed for translation control can't do the job themselves. You need the global stabilizers to activate to prevent uncontrolled rotation. In this case, these would be primarily the more superficial fibers of the medial spinal muscles, including the multifidi and rotators. The other key core muscles would be the oblique abdominals.
If the patient is willing, they will be able to stabilize their SI using the correct automatic muscular activation. This is a powerful and necessary tool for treating most chronic lower back pain patients.
References
- Barbara Hungerford's Web site; the primary paper of interest is her presentation to the 6th World Congress of Low Back and Pelvic Pain, Barcelona, Spain, 2007: "Functional Load Transfer Through the Pelvic Girdle: An Overview of the Research Applicable to the Stork (One Leg Standing) Test." www.amta.com.au/page/dr_hungerfords_articles__related_papers.html.
- "Supine Marching for SI Stability." www.marchellerdc.com/pro_resources/Articles/index.htm#Ex.
- "Ground Reaction Force" is a concept from Judith Aston of Aston Patterning, looking at how to use gravity to assist proper motion. www.astonkinetics.com.
- Test developed by Ruth Lowengart, MD, as shared with the Southern Oregon Orthopedic Study Group.
Click here for more information about Marc Heller, DC.