
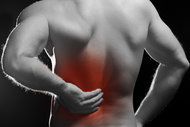


Low back pain with involvement of the sacrum, sacroiliac joints and/or the lumbosacral junction may be the result of a variety of precipitating events. However, if onset of symptoms follows moderate to severe trauma to the pelvis, assessment will require close clinical scrutiny of the sacrum.
The patient typically reports pain in the "tailbone" and can identify the symptomatic region by pointing to the area that is most painful. The presenting complaint suggests malposition of the sacral base or apex (± ΘΧ-axis misalignment.)
Assessment Protocol: Radiographic and Manual Examination Procedures
The definitive assessment for a posterior sacral base or posterior sacral apex is based on a lateral lumbopelvic or sacral spot-shot radiograph. On X-ray, a posterior sacral base is indicated by the following on the lateral view: 1) A decrease in the sacral base angle to less than 36 degrees; 2) Hypolordosis of the lumbar spine; 3) Posteriority of the sacral base George‘s line relative to L5; 4) A posterior open wedge at the L5-S1 disc space.1-2
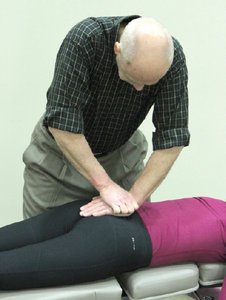 Fig. 1 Sacral Compression Test
Other examination findings may suggest a posterior sacral base or corroborate what is observed on X-ray. Thermal instrumentation at the lumbosacral junction typically shows a break at the lower one-third of the L5 spinous. Motion palpation may reveal extension fixation at L5-S1.2 Patients with a base posterior sacrum usually can stand erect with no significant forward antalgia, but they may demonstrate a positive Minor's sign when rising from a seated position.
Fig. 1 Sacral Compression Test
Other examination findings may suggest a posterior sacral base or corroborate what is observed on X-ray. Thermal instrumentation at the lumbosacral junction typically shows a break at the lower one-third of the L5 spinous. Motion palpation may reveal extension fixation at L5-S1.2 Patients with a base posterior sacrum usually can stand erect with no significant forward antalgia, but they may demonstrate a positive Minor's sign when rising from a seated position.
Two manual tests also may support the analysis. The first is a sacral compression test,3 in which the examiner applies the heel of the superior hand to the first and second sacral tubercles while simultaneously pressing the contact hand down into the sacrum. The pressure should be applied in a posterior-to-anterior (P-A) and slightly inferior-to-superior (I-S) direction through the plane line of the L5-S1 disc to close the open wedge.
To perform the test, take a straightaway stance on either side of the patient at the level of the sacrum. Contact the second sacral tubercle with the heel of the superior hand and take a slight inferior-to-superior (I-S) tissue pull to take out soft-tissue slack. Position the palm of the inferior hand over the dorsum of the contact hand. Apply a gentle-but-firm, continuous pressure to the base of the sacrum from inferior-to-superior (I-S) and posterior-to-anterior (P-A.) Use an arcing motion through the midline of the L5 disc space. Apply pressure until the end range of the joint is achieved and then release slowly.
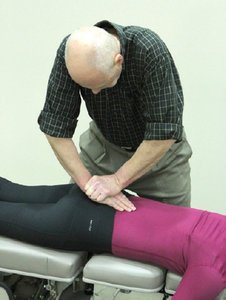 Fig. 2 Sacral Distraction Test
When a patient presents with acute-onset lumbosacral symptoms it is important to avoid an abrupt increase or decrease in pressure to prevent irritating an inflamed or painful facet involvement. Typically, the positive finding for the test is a reduction of lumbosacral discomfort.
Fig. 2 Sacral Distraction Test
When a patient presents with acute-onset lumbosacral symptoms it is important to avoid an abrupt increase or decrease in pressure to prevent irritating an inflamed or painful facet involvement. Typically, the positive finding for the test is a reduction of lumbosacral discomfort.
The other manual test is the sacral distraction test,3 in which the examiner applies the heel of the inferior hand to the third sacral tubercle while simultaneously pressing the contact hand down into the sacrum. The pressure should be applied in a posterior-to-anterior (P-A) and superior-to-inferior (S-I) direction toward the sacral apex.
To perform this test, assume a straightaway stance on either side of the patient at the level of the sacrum. Contact the third sacral tubercle with the heel of the inferior hand and take a slight superior-to-inferior (S-I) tissue pull to remove soft-tissue slack. Position the palm of the superior hand over the dorsum of the contact hand. Apply a gentle-but-firm, continuous pressure to the third sacral tubercle from superior-to-inferior (S-I) and posterior-to-anterior (P-A.) Use an arcing motion directed toward the apex of the sacrum. The maneuver usually exacerbates symptoms by stressing the lumbosacral junction.
As Szulc, et al., observe, "Overstrained intervertebral joints [are subject to] joint capsule stretching and irritation."4 Consequently, it is important for patient comfort and the efficacy of the test to apply just enough force to achieve end range in the joint, and avoid abrupt changes in pressure.
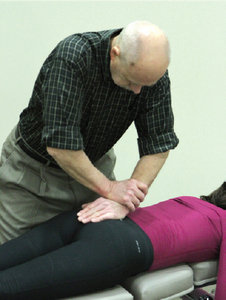 Fig. 3 Base Posterior Sacrum Adjustment
Clinical Note: If further analysis of the pelvis reveals fixation or involvement of the sacroiliac joints, correct those fixations separately. We recommend adjusting the base posterior sacrum first in the case of acute, traumatic onset of symptoms. However, for patients with persistent or recurring complaints of sacral pain, it may be more productive to address sacroiliac joint fixations before correcting the base posterior sacrum.
Fig. 3 Base Posterior Sacrum Adjustment
Clinical Note: If further analysis of the pelvis reveals fixation or involvement of the sacroiliac joints, correct those fixations separately. We recommend adjusting the base posterior sacrum first in the case of acute, traumatic onset of symptoms. However, for patients with persistent or recurring complaints of sacral pain, it may be more productive to address sacroiliac joint fixations before correcting the base posterior sacrum.
How to Perform the Base Posterior Sacrum Adjustment
To adjust a posterior sacral base, assume a straightaway stance on either side of the patient. Using the superior hand, take a contact with the fleshy pisiform (hook of the hamate) on the second sacral tubercle. Take an inferior-to-superior (S-I) tissue pull to take out soft-tissue slack.
Extend the wrist of the contact slightly to preload for the thrust. Position the bony pisiform of the inferior, stabilization hand in the anatomical snuff box of the contact hand and wrap the fingers around the wrist. Apply an arcing thrust directed through the midline of the L5 disc. The line of correction is inferior-to-superior (I-S) and posterior-to-anterior (P-A.)5
Immediate post-checks may not be especially useful, since the complaint frequently involves some local swelling and edema, as well as muscle hypertonicity and point tenderness at the lumbosacral junction, especially with acute onset of symptoms. Even after a successful adjustment, symptoms may persist for several hours. Therefore, it is prudent to advise the patient to avoid strenuous activity and lifting for the rest of the day. The ideal time to re-evaluate the complaint is at the patient's next visit.
References
- Herbst RW. Gonstead Chiropractic Science & Art. Mt Horeb, WI: Sci-Chi Publications, 1974.
- Pettersson HA, Green, JR. How to Find a Subluxation. Davenport, IA: Black Athena Press, 2003.
- Swank L. "Lumbar Spine and Pelvis." Palmer College of Chiropractic, Jan. 8-9, 2011, and Feb. 12-13, 2011; 32 hours.
- Szulz P, et al. The objective evaluation of effectiveness of manual treatment of spinal function disturbances. Med Sci Monitor, 2012;18(5):CR316-322.
- Burns JR, et al. Palmer College of Chiropractic Adjusting Technique Manual. Davenport, IA: Palmer College of Chiropractic, 1981.
Dr. Howard Pettersson, a 1976 graduate of Logan College of Chiropractic, is an associate professor of technique at Palmer College of Chiropractic. He was the senior editor of Activator Methods Chiropractic Technique – College Edition, published in 1989, and published Pelvic Drop Table Adjusting Technique in 1999. His most recent publication, written with Dr. Green, is How to Find a Subluxation, published in 2003.
Dr. J.R. Green is a 1988 Graduate of Palmer College of Chiropractic. He retired from the Palmer faculty after many years of teaching basic sciences and chiropractic technique. He is currently in private practice in Galva, Ill., and is also an adjunct professor of chemistry with the Eastern Iowa Community College District. Dr. Green was one of the writers of Activator Methods Chiropractic Technique (1997) and also worked as a technical writing consultant on Activator Methods Chiropractic Technique – College Edition and Pelvic Drop Table Adjusting Technique.