


Editor's Note: This is the latest article in our ongoing series by health care providers in other fields whose insights are relevant to DCs. This article appeared originally in Massage Today, sister publication to Dynamic Chiropractic.
While most muscles cross over only one joint, the biceps crosses two joints: the elbow and the shoulder. Injuries to the lower biceps cause considerable elbow pain. Here's how to assess and treat an injury to this area conservatively.
Biceps Anatomy & Causes of Injury
The biceps muscle helps to flex the elbow, but more importantly, it supinates the forearm (as in using a screwdriver). It has the greatest mechanical advantage when the elbow is bent at about 90 degrees and is more likely to be injured when the elbow is almost straight. Biceps injuries often result when people attempt to lift objects that are heavier than they realize – for instance, when someone tries to move a big piece of furniture for the first time.
 At its distal end, the biceps has two insertion points. One is a tendon attachment at the radial tuberosity, a rounded projection on the radius located just inferior to the elbow. The other is the bicipital aponeurosis (a fibrous sheet of connective tissue) that fuses into the deep fascia of the forearm on the ulnar side. Injury at either of these locations will cause elbow pain.
Biceps Assessment
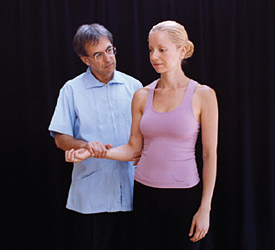
Verifying a biceps injury involves two separate tests; both are crucial to making the correct assessment. The first test is resisted flexion of the elbow. With the patient standing, have them hold the elbow of the injured arm at a right angle, with the palm or the thumb facing the ceiling. Place one or both of your hands on the wrist and ask the patient to flex the elbow as you apply an equal and opposite downward pressure.
Note: In some patients, flexion is very strong. If the patient is much stronger than you are, there is a risk you will be injured. In addition, if you can't hold the arm still in such a way that there is no movement through space, the test will be inaccurate.
 Resisted flexion of the elbow.
You can minimize both of these risks by doing the biceps test with the patient lying supine. In this position you can use your full body weight. Lace your fingers together, wrap them around the radial side of the forearm just above the wrist, and lean back. This way, the patient would have to pull your entire body weight to overpower you.
Resisted flexion of the elbow.
You can minimize both of these risks by doing the biceps test with the patient lying supine. In this position you can use your full body weight. Lace your fingers together, wrap them around the radial side of the forearm just above the wrist, and lean back. This way, the patient would have to pull your entire body weight to overpower you.
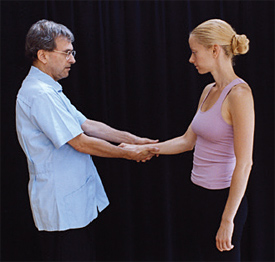
Pain on resisted flexion tells you either the biceps and/or the brachialis muscle is injured. To differentiate between the two, you need to perform one additional test: resisted supination of the forearm.
Again, have the patient stand with their elbow at a right angle. With both of your hands just superior to the wrist, grip the forearm to hold it in place. Lacing your fingers helps.
Ask the patient to try to supinate (outwardly rotate) the forearm so the palm faces the ceiling. Apply an equal and opposite force, not allowing the wrist to rotate at all. Anterior elbow pain felt on both this test and resisted elbow flexion indicates the lower biceps is injured.
Treatment Options
 Resisted supination of the forearm.
The most effective treatment approach for the biceps is a combination of friction therapy, massage therapy and exercise therapy. The injured portion of the tendon will be painful on palpation. If you have difficulty pinpointing the precise site of injury, try having the person flex their arm against resistance – so the tendon tightens and pops up – and then palpate again in that position.
Resisted supination of the forearm.
The most effective treatment approach for the biceps is a combination of friction therapy, massage therapy and exercise therapy. The injured portion of the tendon will be painful on palpation. If you have difficulty pinpointing the precise site of injury, try having the person flex their arm against resistance – so the tendon tightens and pops up – and then palpate again in that position.
Friction therapy is done with no lubricant so you can pin the injured fibers against the bone and perform a friction motion against that resistance to break up the adhesive scar tissue. Be careful to take the skin with you, rather than rubbing over it.
When performing this technique, work for 10 to 12 minutes at a time, taking breaks as necessary. Remember to change hands frequently so you don't strain yourself. Follow the friction with deep massage to the upper arm, lower arm and shoulder, and repeat twice a week for four to six weeks.
Dr. Ben E. Benjamin holds a doctorate in education and sports medicine, and is the founder of the Muscular Therapy Institute. He resides in Cambridge, Mass., and can be reached with questions or comments regarding this article at
![]() .
.