Today we'll introduce specific low-force techniques for the occiput in relation to C1. This is the first of my specific regional technique articles. I'll take three articles to cover the upper cervical spine, including dural releases and C1.
I am tempted to do a review of my first seven articles here, going over the concepts of "just enough," the initial response testing approach to the barrier, using the soft proximal feather edge of the barrier, and layer palpation. I would like to review our primary corrective methods of ELF and recoil. I'd also like to remind you that a restriction in the O-A, or pain at the occiput, could come from somewhere else. We always want to work on our primary subluxations first. (All of these concepts are explained in detail in my earlier Dynamic Chiropractic articles, which you can access on my columnist page on www.chiroweb.com, or on my web site at www.marchellerdc.com.)
Anatomy of the O-A
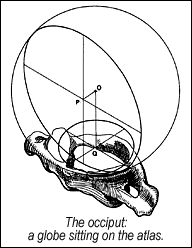
The occiput is the bottom part of the skull, and is where the spine meets the skull. The facets here are different than the rest of the spine. The occiput has convex facets that roll on the concave joint surfaces of C1. One can visualize this as "eggs lying in spoons." Nodding of the head takes place at this junction, with lesser ROM for rotation and side -ending. Several muscles insert into the occiput along the nuchal line. Let's not forget the obvious nerves that run through this area, including the greater and lesser occipital nerves. Many other significant structures pass through or are near the upper cervical area, including the brain stem, the TMJ, and the vertebral arteries. This area has an incredible concentration of proprioceptors.
We all know that an enormous amount of human suffering comes from subluxation in this area. I've always appreciated the concept that upper cervical subluxation creates a disconnect between the head and the heart. When the upper cervical is off, our patients don't always complain of pain, but may describe themselves as feeling off, or just not right.
Screening Tools
Whenever I suspect a problem in an area, I have a quick multi-factorial drill to confirm that there is a clinically significant lesion here. First, is it tender? The tenderness here can be found and rechecked after correction along the bony base of the occiput, at the insertions of the various "capitus" muscles. More medial tenderness tends to lead me to the O-A or dura, more lateral tenderness to C1, the cranium or the SCM muscle. If it's not tender, it's probably not significant. Second, is there restriction? For a screen, we can gently press into the medial occiput, evaluating whether it is stiffer than it should be. For specific joint restriction, we'll go into detail below.
The third part of my screen is the one I do first, but is a more advanced tool. Does "listening" pull me here? Listening is using the heel of the palm of your hand as a Geiger counter; subluxation will attract your hand. With the patient prone, keeping your forearm lined up over the spine, run your palm down the spine, listening with the heel of your hand. Use palpation for tenderness and restriction to confirm your findings.
Occiput-Atlas Joint Restrictions
Long Axis Restriction
Is the occiput jammed caudally onto the atlas? To test this, pull up gently on one or both sides of the occiput, in relation to C1. The positive finding here is a hard stop, an articular restriction feel. If the head is jammed down here, you need to lift it off the neck. You can use your usual thrust techniques, or use prone or supine recoil (engage-release). Since you've found it supine, a simple correction is to gently traction superiorly with your finger pads, focusing on the side of the occiput that is more restricted. Slightly turn the head in the direction that maximizes the feeling of restriction. At this point, suddenly release your pressure to recoil. You can also use ELF here, a slow fascial release, but you will usually want to combine it with recoil or HVLA thrust techniques to release the articular component.
Flexion-Extension and Sidebending
Restriction-Muscle Energy Approach
Here is the main technique I'm trying to describe: Muscle energy, an osteopathic technique better described as postisometric relaxation applied to joints, has an elegant view of the this C0-C1 junction. Muscle energy, by activating and then releasing the small intersegmental muscles, has a unique and powerful effect, both releasing the joint restriction and retraining/releasing the muscles.
George Such,DC, superbly describes O-A joint restrictions and a variety of techniques in Chiropractic Technique (August 99, volume 11, #3).
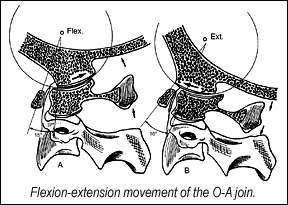
A screen for this area is to have the supine patient nod his head, isolating the motion to the head, not the neck. If the patient's nose ends up off-center at the end of nodding flexion or extension, there's probably abnormal motion at the O-A.
To evaluate via palpation, cradle the base of the skull with the palm and heel of both hands. Your fingers are passive, and rest under the upper cervical. Your thenar pads rest on the temporal and parietal area. Avoid thumb pressure into the sensitive temples (greater wing of the sphenoid). Gently rock the occiput on the atlas in an A-P and P-A motion. Evaluate if the occiput resists either forward or backward glide. Remember that you are working with the convex occipital condyles on the concave lateral masses of the atlas, so your glide is neither directly forward nor backward, but follows the circumference of a globe. If the whole neck is moving, you are not doing the test correctly. We are attempting to isolate C0 on C1. I tend to find restriction of posterior gliding of the occiput more often, which is consistent with the typical chin poke posture. We'll use a restriction of posterior gliding as our example.
Our second evaluation piece is to stack, or add another direction. When you get to the beginning feather edge of the posterior glide barrier, take the head/occiput into lateral to medial glide, first from the left, then from the right. For our example, we'll assume they cannot glide from left to right. You now have your barrier set up in two dimensions, which is plenty for this area. You could use ELF here, gently engaging the barrier, and listening and following to fine tune the correction. I almost exclusively use muscle energy for this adjustment.
Here's our muscle energy correction. You could use the same handhold described above, but I tend to change positions for the correction. My active hand would be on the left side in the example, the side that the patient cannot laterally bend away from. My active hand contact uses my thenar pad on the mastoid process. My other hand guides the head into posterior gliding, by cradling the posterior skull and the vertex.
Step 1 - Begin by engaging the feather edge of the barrier, by pushing gently into posterior glide, and left to right side bending.
Step 2 - Have the patient resist your motion in a single plane, as you isometrically push toward the barrier. When you ask the patient to push, they usually use too much muscle power, thus engaging the large muscles rather than the intersegmental ones alone. For the occiput, its usually enough to ask them to look in the direction you would have them push. This may befuddle your brain until you do it on a patient. In this case, have the patient look up or to the left. By looking up, they are activating the muscles that would induce anterior glide, by looking to the left, they are activating the right to left muscles. So, by just looking, they are isometrically resisting you. If you don't feel their resistance, you could ask them to push directly but gently into your active hand. They resist for 3-5 seconds, and then tell the patients to relax.
Step 3 - As they relax you can either feel the barrier recede, or follow the barrier a little further, or push a bit further into the barrier. DCs like to push into the barrier. I'm just reminding you to be gentle, and that the correction happens almost by itself in the postisometric phase. If you have them take a deep breath during the resistance phase, and breathe out in the relaxing phase, it works even better. You will repeat this contract and then relax motion three times, more if needed. You should feel the barrier diminishing on each repetition, and you should have much better motion after completion, as well as less occipital tenderness.
The keys to an effective muscle energy adjustment are twofold. One, engage just to the feather edge of the barrier, using body position and your own pressure. Two, train the patient to use mild counterpressure, activating just the little muscles around the joint.
Your patients will love how easy and nontraumatic this correction is for them. You'll like how effective it is. I hope this article helps you help a few more of your patients.
My next article will address dural restrictions affecting the upper neck. Your really difficult upper neck patients, in my experience, will have a whole series of restrictions either in this area, or affecting this area. Be as thorough as you know how. I truly believe that our ability to treat most problems in limited only by our own shortcomings is knowledge of anatomy and functional relationships.
References
- Such G., Upper cervical synthesis: Integrative manual care of the occipitoatlantal joint. Chiropractic Technique, August 99, vol.11, #3.
- Mitchell FL. The Muscle Energy Manual, vol. 1, MET press, 1995.
- Rex L. Introduction of muscle energy techniques, (course notes), Edmonds, WA, Ursa Foundation; 1996, p. 244-249.
- Greenman P. Principles of Manual Medicine, 2nd edition. Williams and Wilkins, 1996.
- Chauffour P. Lien-Méchanique (Mechanical Link), 1986.
- Mechanical Link classes, 1-4, 1997-2001. Paul Chauffour (through Upledger Institute).
Click here for more information about Marc Heller, DC.


