Assessment
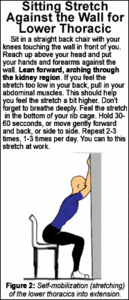
How can you assess the thoracolumbar joints? Typically, you'll notice on generalized motion testing that the whole of the thoracolumbar area is stuck in flexion, and resists extension. This is extremely common. Your rehabilitation efforts need to focus on this whole pattern, looking at the muscles described above. I've included a picture and brief description of my favorite extension stretch for this area in the sidebar on page 18. You will also want to address the other aspects of the muscular component here with soft tissue work and home exercise.
You should be specific in your joint assessment (test them sitting for the best accuracy). First, does the area that lacks extension have a fulcrum, a motion segment that is more restricted than the others? This is really the essence of the palpatory art, picking out the most restricted segment from a generally restricted region. Second, what is the specific direction of that restriction?
Use a contact on the spinous processes or on the bilateral transverse processes, taking them into gentle extension to find the segment that resists extension the most. Test resistance to side-bending by side-bending the entire trunk, fulcruming at the spinous process. The restricted segment will often be prominent on the right, and resists left side-bending. The segment will usually resist rotation to the left, tested via P-A motion on the right transverse.
You may prefer a lighter touch to your palpation, using Initial Response Testing, testing initial motion, rather than the end range. We discussed this in our article on the barrier (http://www.chiroweb.com/archives/19/16/12.html).
There is a different quality to segments that resist extension, compared to those that resist flexion. The muscle energy model describes these as segments that resist closing. As DCs, most of our adjustments open joints, so the concept of closing a joint that is stuck open is a bit foreign to most of us. The other weird part about this concept is that the side that is stuck open is not the prominent side, but the opposite side. Don't let this confuse you if you are not biomechanically minded. The key thing is that when something is stuck open, sometimes you cannot just directly close it, you may need to open it further first. We'll see how this applies when we discuss correction.
Correction
My usual low-force adjustment here uses muscle energy, the patient's own activation of the small intrinsic muscles to get the joint to relax. You can review our last article on the upper thoracics www.chiroweb.com/archives/20/20/07.html for a basic review of muscle energy principles.
Correction
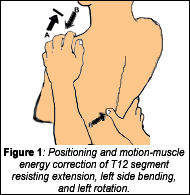
Step One - Positioning: First, I'll attempt to restore the lateral bending and rotational components. This example assumes that T12 resists extension, left lateral bending and left rotation. My left hand is on top of the patient's left shoulder. My thumb or pisiform is on the left T12 spinous process. I'll use the left spinous process as my fulcrum. I'll sit behind or to the left side of the patient, and carefully position his trunk into gentle lateral bending so that the restricted segment is at the fulcrum. I'll push the spinous process toward the right, until I reach the soft lateral bending barrier. I'll then add a little rotation by bringing his shoulder posterior, again just up to the soft edge of the barrier. This completes the initial positioning component.
Note: For very stuck joints, begin with an indirect approach. Sometimes this subluxation pattern will feel completely locked, and resist your direct muscle energy correction. If so, I start by opening the joint further. I'll move to the right side of the patient, and begin by pushing the T12 spinous process from right to left, asking him to lift the right shoulder, and then feeling the release into right lateral bending. This is the reverse of the previous step one. Yes, this is completely opposite from the direction I want to eventually go, but the indirect approach can be the ideal way to start. Once it frees in this direction, reverse, and move the spinous from left to right, as described in step one.
Step Two - Isometric Activation (A - in Fig. 1): Now I'll ask the patient to gently lift his shoulder using his whole spine. This should activate the right lateral bending muscles, ideally just the ones around my fulcrum. The patient holds this gentle, isometric contraction for 3-5 seconds, then I ask him or her to relax.
Step Three - Relaxation and Correction (B - in Fig. 1): As he lets go, I pull the left shoulder inferior, and use the spinous process to push the segment across to the right. I only take the segment as far as the body easily allows, up to the next elastic barrier. I've simultaneously moved the vertebrae toward correction, and have repositioned the patient for my next repetition.
Step Four - Add Extension: If the area begins to release smoothly, I'll add movement into extension. On the second or third repetition of the motion into lateral bending, during the relaxation phase, I'll instruct him to let his belly relax toward the right knee. This cue generally encourages or allows proper extension. I never try to force the patient into extension. Make sure that he is extending at the segment involved, not above or below. I'll use at least four or five repetitions to get this just right. I don't add extension until I get the side-bending motion re-established.
Remember the keys to successful muscle energy adjusting. First, the patient uses minimal isometric contraction. Second, the doctor only pushes to the soft edge of the barrier; don't force all the way to the completely locked point. Third, position the patient with the fulcrum at the point where you want the motion to occur.
Step Five: Once I free the joint, as described in the two or three steps above, I'll often finish with a high-velocity, low- amplitude adjustment (HVLA). Yes, I do these in conjunction with the low-force adjusting, and routinely use HVLA in the thoracic spine. My preference is to do this standing, against a padded wallboard, lining up the joint to create extension, left-lateral bending, and left rotation. As this is the first time I've talked about HVLA adjusting, I should explain further. I use HVLA daily. I don't use it on every patient, but I probably do a thrust on about half of my patients. I tend to use more HVLA on big, physical people, who generally like a more physical approach. Correspondingly, I'll use strictly low-force methods on constitutionally weaker people: fibromyalgic folk, chronic myofascial pain patients, and people with less muscular bulk. For patients who don't really understand that the low-force methods are spinal adjustments, I'll often use my wall board for an A-P type HVLA adjustment in the thoracic spine. They get to experience the sudden release a good HVLA adjustment generates in the nervous system. If the patient likes the feeling of an HVLA adjustment, they leave knowing that they got a "real" adjustment. There is nothing wrong with enhancing the placebo or nonspecific effects of the work.
I almost always begin with lower force methods. First, I'll release the dural and fascial and intrinsic muscular components with my low-force methods. If I still feel there is an osseous component that has not fully released in the joint, I'll often add an HVLA thrust.
The thoracolumbar junction is a critical area. Using these ideas, you'll improve your results in this area, and in the many other areas the lower thoracics can affect throughout the body. Don't forget to involve the patient in the rehabilitation component. The patient should reinforce your corrections daily.
(Note: Writing this article gave me a feeling of deja vu. My first article published in Dynamic Chiropractic was "Find It, Fix It, Retrain It." It detailed this subluxation, and emphasized how to rehabilitate this area. It's still a good article, and you can find it at www.chiroweb.com/archives/17/04/15.html).
References and Resources
- Rex L. Introduction of muscle energy techniques (course notes). Ursa Foundation, Edmonds, WA, 1996, p. 244-249.
- Evaluation and treatment of the thoracic spine and rib cage (seminar). Mark Bookhout,MSPT, Medford, OR, 1999.
- Jull G, Janda V. Muscles and motor control in low back pain. In: Towmey LT. Physical Therapy for the Low Back, Clinics in Physical Therapy. Taylor JR (eds), Churchill Livingstone, 1987.
- Such G. Integrated manual therapy (course), 1999.
Click here for more information about Marc Heller, DC.


