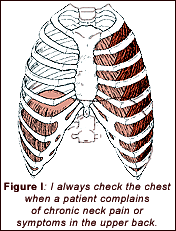
What symptoms come from anterior chest wall restrictions? The most obvious symptom is chest pain, which may mimic heart disease. This pain is often caused by sternocostal joint restrictions. The pain may be felt over the affected joint, or be felt across the entire chest. If the patient has no other red flags indicating heart problems, I will treat the chest pain with our approach, and refer out for cardiac evaluation if the problem persists. Often, patients are so afraid of chest pain that they have already sought medical evaluation for heart involvement before seeking chiropractic care.
Chest restrictions can contribute to numerous problems throughout the body. I always check the chest when a patient complains of chronic neck pain or symptoms in the upper back. If a patient is having trouble taking a deep breath, I suggest checking the ribs, both front and back.
Examining the Rib Cage
Rib restrictions are found in many locations along the rib cage. To screen or do a quick check, assess the sternocostal and costovertebral junctions. When I find involvement at a particular level - in front, or back, or both - I follow the steps in the complete assessment described below. Your contact can be your thumb, finger pads, thenar or hypothenar pads for all of these assessments and corrections. If you train yourself to use the base of your hand, your fingers and thumbs will last longer. This area lends itself to assessing at the beginning of the barrier, using initial response testing (see www.chiroweb.com/archives/19/16/12.html).
Assessment
- Assess the sternum itself for stiffness. Does it have intra-osseous restrictions? (See www.chiroweb.com/archives/19/23/12.html.)
- Check the sternocostal junction at the lateral edge of the sternum at the levels of the various chondral attachments. Remember, these are joints between the bony sternum and the cartilaginous extension of the rib.
- If you find a sternocostal involvement, slide your palpating hand laterally and check the costochondral junction.
- Check the lateral chest wall along the mid-axillary line with a broad contact and a specific contact right over the involved rib.
- Check posteriorly at the costovertebral junction and the thoracic vertebrae themselves.
- Check all along the course of the rib for intercostal muscle trigger points, avoiding the tissues directly under the breast.
A rib cage restriction can involve just one specific rib, or a whole region, three or four ribs in a row. If you find a regional restriction, identify if it is anterior, lateral, or posterior, and treat it as restricted fascia. This broader restriction can represent tissues deep to the rib cage, such as the pericardium, lungs, or the liver. These tissue restrictions are addressed in visceral manipulation.
Correction of Chest Wall Restrictions
Correction of an anterior rib lesion can be done with recoil (engage-release), ELF (engage, listen, follow) (see http://www.chiroweb.com/archives/19/18/07.html), or an Activator instrument. These low-force techniques work quite well here. The anterior chest does not lend itself to HVLA adjusting; you will rarely get an audible release, and you risk breaking a rib or separating the cartilage.
The first directional decision here is to decide whether the rib resists inferior or superior motion. This will be consistent with tenderness at the inferior border of the rib when it resists superior motion, and vice-versa. Add the exact three-dimensional restriction via palpation, and then, using ELF, just gently begin moving the rib in that direction, following the body's own motion while holding at the barrier. The usual rules apply. Your engagement is at the beginning or elastic component of the barrier; your pressure is just enough to initiate motion. If the release stops prematurely, use recoil to restart it, then finish with ELF. When you are done, the rib should be less tender and move more freely.
Two New Corrections for Ribs
I want to share two different types of corrections that may be new to you. They are both variations on ELF. The first is a two-hand contact surrounding the rib cage, in which you are paying attention to the changes occurring between your hands. You can use this method to simultaneously correct a rib subluxation in the back at the costovertebral joints, and in the front at the sternocostal joints. With the patient supine, find the most restricted anterior sternocostal joint with one hand; with your other hand, reach under the patient and find the same level of rib where it meets the spine. You can test whether you are on the corresponding level in the back by pushing anterior to posterior (AP) with your front hand and feeling for motion in the back. You can use either the tips of your fingers, or your thenar eminence. You will be pushing gently AP on your anterior contact, and gently posterior to anterior (PA) on your posterior contact.
Begin the correction by laterally tractioning both contacts. This begins to disengage the rib. Pay attention to which direction your hands are pulled. Does the rib seem to float posterior or anterior? The direction that the rib floats toward indicates the primary restriction. (If it is not obvious to you, don't worry. You can still effectively do the technique.) Focus on the primary restriction, in either the front or the back, and load this three- dimensionally into the direction of most resistance, i.e., into the barrier. This would involve a superior versus an inferior motion, and a clockwise rotation versus a counterclockwise one.
The rib will usually need lateral motion as the third dimension. Do the same for the second contact; it will usually go in a somewhat opposite direction. This completes the engage portion of the correction; now listen and follow. This means you hold at the elastic aspect of the barrier while the tissues reorganize themselves and release. This will usually take 10 to 60 seconds. If no movement occurs in the tissue, it usually tells me that my contact is too strong, and I need to back off a little. This technique is great for releasing the whole of the rib and addresses both the posterior and anterior components simultaneously.
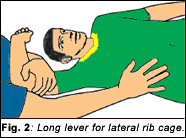
The second new technique uses a long lever, which will release fascial restrictions found in the rib cage at the midaxillary line or anywhere along the rib. Most chiropractic adjustments use a short lever - a direct contact on the locked vertebrae. This adjustment starts with a direct contact on the fixated part of the rib. The long lever is a controlled movement of the arm designed to release the fascia connecting the arm and the whole of the axilla to the rib. This two-hand, long-lever contact addresses many more of the tissue restrictions. In some ways, this is similar to Active Release of Patrick Leahy,DC, or Integrated Fascial Release of Warren Hammer,DC; in other ways, it is substantially different. The main differences are that the arm does not go through a full range of motion, and that the patient does not control the arm. The doctor takes the arm and lifts it just until he begins to feel the tension build, then uses the ELF concept to feel the slow release of the tissue. Again, we are using the concepts of "just enough" and working at the feather edge of the barrier.
Our primary contact here is a thenar contact on the rib near the midaxillary line. I first assess whether the rib is more restricted moving in an inferior direction (the common finding), or more restricted moving superior. I then contact the rib and engage it in a three-dimensional way. Does it resist going in an anterior or posterior direction? Is there a torque component? Once I have engaged the rib, I begin to lift the homolateral arm. I have maximal control of the arm if I contact just above the elbow. I test and see if either abduction or flexion of the arm maximizes the fascial pull. The common error is to take the arm too far, going right past the barrier. I'll often need only 20 degrees or less of abduction or flexion. Find the new barrier, then fine-tune the arm position, adding slight internal or external rotation.
This completes the engage portion. Now I just listen and follow, and let the tissues release. You can use this same technique on myofascial restrictions in this area. Contact the subscapularis and/or to the pectoralis minor with one hand, and use the arm as a long lever.
The anterior and lateral chest wall is an often neglected area. You will get dramatic changes when you address this area. You will more effectively change the posture and pains of your patients when you directly address the collapse and/or rigidity of the chest. The thorax is a large and important area. I invite you to expand your toolbox and attend to the whole of the thoracic cylinder.
| Special Considerations before Touching the Chest Area Examining the chest area requires your care and gentleness. Consider the following warnings before attempting to check for chest restrictions: Warning #1: The chest can be a sensitive area, and doctors, especially male doctors working on female patients, need to consider their approach. First, the chest is a storage site for emotions, which are held in the physical body or soma. Working here will often bring up old emotional baggage for a patient. Your patients need to be told this, so they are not overly disturbed by feelings that may arise. They also need permission to process or share their sensations, whether with a friend, family member, counselor, or the doctor - if you choose to take on this role. I realize I sound like a counselor here, but this is necessary information for the patient, if you choose to address the chest. Warning #2: I avoid the breast tissue as best I can. The areas I am interested in are deep within the breast, and different patient positioning can get the breasts out of the way. You can ask the patient to use her hand to move the breast tissue away from your contact point. Even if I am not directly over the breast, I always ask permission: "I'm going to touch your chest and check for restrictions there. Is that okay with you?" I then wait until I get a positive response before I touch the patient's chest. |
References and Resources
- Heller M. Framework low-force manual adjusting series. Dynamic Chiropractic. See links in article.
- Hammer W. Genitofemoral entrapment using Integrative Fascial Release (IFR). Chiropractic Technique 10(4); 1998:169-176.
- Barral JP. Visceral Manipulation: The Thorax. Eastland Press, 1992.
- Visceral Manipulation II. Class at Upledger Institute.
- Leahy MP. Improved Treatments for Carpal Tunnel and Related Syndromes. Chiropractic Sports Medicine, 1995.
Click here for more information about Marc Heller, DC.


