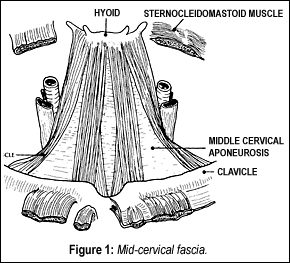
Most of us tend to think of the myofascia, or the fascia, in terms of the musculature. The fascia, in its broader context, lines all the body structures, including the muscles, joints, and bones. Consider the middle cervical fascia, a structure that connects a whole series of muscles throughout the front of the neck (Figure 1). I believe that the fascial restrictions are often the key to neuromusculoskeletal dysfunction, thus a key structure for chiropractors to recognize and learn to address. The techniques described here are a variation on myofascial release. Assessment and correction of these fascial structures is well described in Barral's book, The Thorax.
Two of the key structures that pull the lower cervicals forward and inferior are the middle and deep cervical fascia. These fascial structures, when shortened, contribute to the inferior pull on the lower cervical spine. The fascial tightness can compress the brachial plexus as it exits through the thoracic outlet and reinforces the subluxation - the anterior and inferior positioning of the lower cervical spine.
The Middle Cervical Fascia
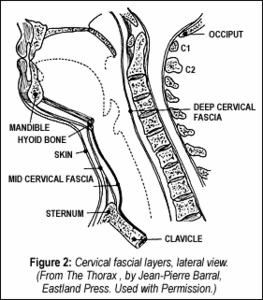
The middle cervical fascia begins at the hyoid bone, investing the infrahyoid muscles to insert into the clavicle and the acromium process of the scapula. The anatomy leads to the assessment.
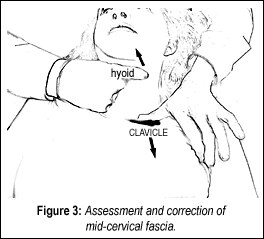
With the patient supine, contact the inferior aspect of the hyoid bone bilaterally, using the thumb and index finger. Remember the location of the hyoid. It is just under the inferior ramus of the jaw. It has a unique feel along its lateral margins, where you will contact the cornu, or horns, of the hyoid. Your other hand will contact the superior surface of the clavicle using a broad thumb or index finger contact. Begin by pushing inferior at various points along the clavicle, working your way laterally to the acromium process of the scapula where the omohyoid inserts. As you gently push downward, feel for resistance under your inferior hand. At the same time, your upper finger will feel as though it were being pulled down by the hyoid. Specific fibers of this wide fascial band can become restricted.
The assessment leads to the correction. From your palpation position, continue to separate the two ends of the fascia. It's like pulling taffy. Find the exact three-dimensional quality of the fascial pull - hold at the beginning of the barrier and follow the release of the tissue.
Some chiropractors tend to pull or push too hard. Remember the ELF - "engage, listen, follow" technique. Begin by gently engaging the elastic part of the barrier, then stretching ever-so-gently from there. It doesn't require much force to release this thin fascial band. Feel the tissues lengthen under your hand.
The Deep Cervical Fascia
The deep cervical fascia surrounds the body of the vertebrae in the cervical spine. The anterior part of this fascia extends down to the first rib. Once again, the anatomy leads to the assessment. Motion palpate the cervical spine and look for the most restricted region or segment from C2 on down. I like to palpate from lateral to medial to screen. This may not correlate exactly with the restricted anterior lower cervical segment, which is usually C6 or C7.
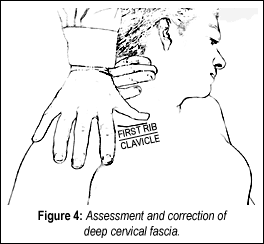
Once you determine which side and segment is most restricted, your upper hand takes a lateral contact on the cervical pillar. Your lower hand contacts the anterior-superior portion of the first rib as it curls behind the clavicle. It's easier to contact the first rib if you relax the muscles by bending the neck to the side you are assessing. Again, the lower contact may vary medially to laterally as you look for that portion of the fascial band that is restricted. To assess, pull in a superior-medial direction on the involved vertebrae by gently bending the neck away. Simultaneously push inferior on the first rib. If you feel a restriction along this line, go ahead and release this fascia.
The correction again follows from the assessment, with a slight variation. Your upper contact wraps around the occiput with the heel of your upper hand, while your index finger contacts the restricted segment. The lower contact is an index or thumb on the superior aspect of the first rib.(Figure 4) Stretch this structure by bending the neck to the side, using your upper contact as the fulcrum.
The instant you feel the fascia engage in the stretch, slow down and follow the pace at which the fascia is able to release. Fascia is tough stuff and responds best to relatively slow stretching. If you line up everything correctly, the fascial will generally release in 10 to 30 seconds, and occasionally take up to one minute. My French teachers and I disagree with most myofascial release teachers about how long it takes to release fascia. The key to a relatively quick release is the three-dimensional alignment of your pull. There is an exact direction where the body suddenly will cooperate with you and begin to let go. If the fascia is not releasing, fine-tune your direction or search for a more primary lesion.
Several other fascial structures affect the cervical-thoracic junction. Consider the fascia that connects the superior pleura (the upper part of the lining of the lung) to the lower cervical vertebrae. The clavipectoral fascia also contributes to the thoracic outlet syndrome.
If you want your adjustments to hold - if you want to experience the full power of the body to heal itself - you must address the fascial restrictions. Our adjustments are powerful tools, but addressing the joints alone is not sufficient in difficult or chronic cases.
Resources
- Barral JP. The Thorax. Eastland Press, 1991.
- Framework classes, Marc Heller,DC, Portland, Oregon, 2001.
- Heller M. Adjusting techniques, Part II. Dynamic Chiropractic, Sept 1, 01;19(18)32,34 (www.chiroweb.com/archives/19/18/07.html).
Click here for more information about Marc Heller, DC.


