


When was the last time you assessed proper ankle mobility? This often-neglected area can be a surprisingly devious culprit in numerous musculoskeletal dysfunctions.
Maximizing joint mobility is critical in the matrix of functional human movement. Loss of mobility in the ankle will always lead to compensations further up the kinetic chain. All joints must have a certain amount of mobility to maintain proper stability, thus allowing the joints above and below to work effectively. If ankle mobility is restricted in a dorsiflexion pattern, the body must make up for that loss of mobility further up the chain in areas that require more stability, such as the knee, lower back, and even the scapula. These altered microtraumatic movements in function may then lead to pain.
For a wide range of movements – from sprinting to lunging to squatting – you need a certain amount of dorsiflexion. Normal ankle mobility should allow for moving the knee 4 inches or more past the toes. If you don't have it, the body will have to compensate. It's the very definition of a homeostasis paradigm. One of the most common occurrences in people with a lack of dorsiflexion ROM is an "out-toeing" and overpronation, as this opens up the ankle, allowing for more movement – even if it isn't the most biomechanically correct way to do so. In moments of adaptation, the body does not always do the most biomechanically advantageous things. This out-toeing may also be caused by hip internal rotation deficit (HIRD), so it's important to assess both areas during your examination process. Work your way up the chain.
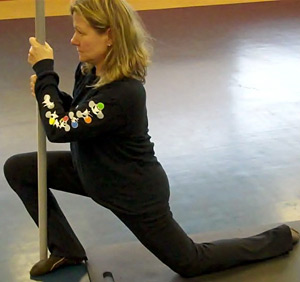 The ankle mobility drill (AMD) is a very effective exercise your clients can do themselves to increase ankle mobility. It will be one of the key exercises in your arsenal of restoring functional movement. There are many important muscle activation firing patterns during the drill, which are critical for proper cueing. Below is a checklist of cueing techniques for maximum benefit. Please reference the picture for visual representation.
- The first key to ankle mobility work is to understand that it is a mobility drill, not a flexibility/stretching drill. You want to rock the ankle back and forth, not hold the stretch.
- The second key is to watch the heel. It is essential that the heel stay in contact with the floor. Most people who have ankle mobility restrictions will immediately lift the heel. You may need to hold the heel down for beginners so they get the feel.
- Have the patient get into a half-kneeling position and maintain the downward knee centered below the extended hip.
- Use a stick or pole and position it on the outside of the front foot near the little toe.
- Prior to initiating the movement, press the downward knee into the floor to activate the gluteus muscles (make sure there is a pad underneath the knee). The purpose is to teach glute activation prior to hip extension.
- Grasp the pole with both hands and press into the ground, activating the core muscles.
- While maintaining an upright "tall spine" position (not flexing forward at the waist), lunge forward, ensuring that the forward knee goes to the outside of the pole. This will prevent the foot from falling into a dysfunctional compensatory pronation pattern to obtain more motion at the joint.
- Make sure the hips stay squared off and straight ahead with no rotation.
- Return to starting position and repeat 15 times bilaterally. Maintain pressure on downward knee and pole at all times. It is normal to feel a stretching sensation in the back of the calf.
Check the ankle for normal alignment if the patient experiences a pinching sensation in the ankle mortise. Subluxation of the talus may be a causative factor. Normal alignment of the ankle and subtalar joints should be established prior to mobility drills. Also evaluate the proximal and distal tibia/fibula for proper biomechanics. Mobilization techniques are often necessary when significant restrictions are discovered.
After performing the AMD and changing joint alignment, it is now time to activate muscles that contribute to ankle dorsiflexion. These movements are used to activate and teach the body how to neurologically control the new range of motion. This will help ensure muscle memory and proper motor control for dynamic changes under vector loads.
- Have the patient get into a seated position. Use a resistance band attached to the foot so the toe is pulled away from the shin, with a pad under the calf so the heel is off the ground.
- Using only the ankle, pull the toes to the shin and then return to start position for 20 repetitions. Do not allow any movement throughout the leg or hip during the exercise.
- Then perform 10 repetitions of a dynamic reverse lunge bilaterally to mimic the half-kneeling position of the AMD. This integrates a full-body stabilization component to help transition into activities of daily living.
AMDs are a form of corrective exercise that should be a primary component of your treatment program. Corrective exercise targets movement-pattern dysfunction and is specifically directed at mobility, stability and coordination problems. Corrective exercise should be dysfunction-specific and performed on individuals with a specific movement pattern deficiency, such as ankle dorsiflexion restriction. Incorporating ankle mobility drills into your therapy program facilitates improved ankle mechanics and stability, while also improving mechanics up the chain. Take the necessary time to look outside the site of pain at deeper causative factors for greater success.
Resources
- Cook G. Movement: Functional Movement Systems: Screening, Assessment, and Corrective Strategies. Santa Cruz, CA: On Target Publications, 2010.
- Cressey E, Fitzgerald M. Maximum Strength: Get Your Strongest Body in 16 Weeks with the Ultimate Weight-Training Program. Philadelphia, PA: Da Capo Lifelong, 2008.
- Heiler J. "Preventing Hamstring Injuries: Part I." EliteFTS - Powerlifting and Strength Training Products and Knowledge for Lifters, Athletes, Coaches, and Trainers.
- Voight ML, Hoogenboom BJ, Prentice WE. Musculoskeletal Interventions: Techniques for Therapeutic Exercise. New York: McGraw-Hill, Medical Pub. Division, 2007.
Click here for more information about Perry Nickelston, DC, FMS, SFMA.